31 May, 2010

ASP.NET: Using pickup directory for outgoing e-mails

ASP.NET: Using pickup directory for outgoing e-mails: "
Sending e-mails out from web applications is very common task. When we are working on or test our systems with real e-mail addresses we don’t want recipients to receive e-mails (specially if we are using some subset of real data9. In this posting I will show you how to make ASP.NET SMTP client to write e-mails to disc instead of sending them out.

SMTP settings for web application

I have seen many times the code where all SMTP information is kept in app settings just to read them in code and give to SMTP client. It is not necessary because we can define all these settings under system.web => mailsettings node.
If you are using web.config to keep SMTP settings then all you have to do in your code is just to create SmtpClient with empty constructor.

var smtpClient = new SmtpClient();

Empty constructor means that all settings are read from web.config file.

What is pickup directory?

If you want drastically raise e-mail throughput of your SMTP server then it is not very wise plan to communicate with it using SMTP protocol. it adds only additional overhead to your network and SMTP server. Okay, clients make connections, send messages out and it is also overhead we can avoid.
If clients write their e-mails to some folder that SMTP server can access then SMTP server has e-mail forwarding as only resource-eager task to do. File operations are way faster than communication over SMTP protocol. The directory where clients write their e-mails as files is called pickup directory.
By example, Exchange server has support for pickup directories. And as there are applications with a lot of users who want e-mail notifications then .NET SMTP client supports writing e-mails to pickup directory instead of sending them out.

How to configure ASP.NET SMTP to use pickup directory?

Let’s say, it is more than easy. It is very easy. This is all you need.

<system.net>
<mailSettings>
<smtp deliveryMethod="SpecifiedPickupDirectory">
<specifiedPickupDirectory pickupDirectoryLocation="c:\temp\maildrop\"/>
</smtp>
</mailSettings>
</system.net>

Now make sure you don’t miss come points:
  1. Pickup directory must physically exist because it is not created automatically.
  2. IIS (or Cassini) must have write permissions to pickup directory.
  3. Go through your code and look for hardcoded SMTP settings. Also take a look at all places in your code where you send out e-mails that there are not some custom settings used for SMTP!
Also don’t forget that your mails will be written now to pickup directory and they are not sent out to recipients anymore.

Advanced scenario: configuring SMTP client in code

In some advanced scenarios you may need to support multiple SMTP servers. If configuration is dynamic or it is not kept in web.config you need to initialize your SmtpClient in code. This is all you need to do.

var smtpClient = new SmtpClient();
smtpClient.DeliveryMethod = SmtpDeliveryMethod.SpecifiedPickupDirectory;
smtpClient.PickupDirectoryLocation = pickupFolder;

Easy, isn’t it? i like when advanced scenarios end up with simple and elegant solutions but not with rocket science.

Note for IIS SMTP service

SMTP service of IIS is also able to use pickup directory. If you have set up IIS with SMTP service you can configure your ASP.NET application to use IIS pickup folder. In this case you have to use the following setting for delivery method.

SmtpDeliveryMethod.PickupDirectoryFromIis

You can set this setting also in web.config file.

<system.net>
<mailSettings>
<smtp deliveryMethod="PickupDirectoryFromIis" />
</mailSettings>
</system.net>

Conclusion

Who was still using different methods to avoid sending e-mails out in development or testing environment can now remove all the bad code from application and live on mail settings of ASP.NET. It is easy to configure and you have less code to support e-mails when you use built-in e-mail features wisely.

List of Database Engine Error Messages

List of Database Engine Error Messages: "
All system and user-defined error messages in an instance of the Database Engine are contained in the sys.messages catalog view.
Here’s how to query this catalog view to list the Error Messages based on their severity
SELECT * FROM sys.messages 
WHERE language_id = 1033
ORDER BY severity desc
OUTPUT
Error Messages SQL Server
The error message describes the cause of the error whereas the severity indicates how serious the error is.You can read more on the different Level of Severities over here Database Engine Error Severities
"

Auto Generate AlphaNumeric ID’s in a SQL Server Table

Auto Generate AlphaNumeric ID’s in a SQL Server Table: "
I was recently working on a query to auto generate a Column ID based on an IDENTITY column. I used computed columns to achieve this. If you too have a similar requirement, then here’s the query.
DECLARE @TT TABLE (
CandID as 'C-' + RIGHT('000' + CONVERT(varchar, CourseID),5),
CourseID int IDENTITY(1,1),
ReferrerName varchar(10)
)

INSERT INTO @TT VALUES ('Dhiraj')
INSERT INTO @TT VALUES ('Jack')
INSERT INTO @TT VALUES ('Kelly')
INSERT INTO @TT VALUES ('Jack')
INSERT INTO @TT VALUES ('Dhiraj')

SELECT * FROM @TT
OUTPUT
Auto Generate SQL Server Column
Observe how the values of the CandID column are autogenerated based on the values if the CourseID column.

20 May, 2010

String.Format("{0}", "formatting string"};


One of the painful things about good old ASP was string formatting, VBScript
simply didn't have anything useful. C# (and VB.Net) do, but MSDN doesn't provide
a quick reference to the formatting options. So here's a quick reference.


To compare string formatting in C# to those in C lets have an example,

char szOutput[256];

sprintf(szOutput, "At loop position %d.\n", i);


sprintf takes an output buffer, a format string and any number of arguments to
substitute into the format string.

The C# equivalent for sprintf is String.Format, which takes a format string and
the arguments. It returns a string, and because you're not passing in a buffer
there's no chance of a buffer overflow.

string outputString = String.Format("At loop position {0}.\n", i);

So why doesn't have the format argument have parameters specifying what data
type you're formatting? The CLR objects have metadata which informs the CLR what
the objects are, and each object has a standard ToString() method which returns
a string representation of that object. Much nicer than C where if you passed
the wrong type of variable into sprintf everything could come crashing down.

The ToString method can accept a string parameter which tells the object how to
format itself. In the call to String.Format , the formatting string is passed
after the position, for example, "{0:##}". The text inside the curly braces is
{argumentIndex[,alignment][:formatString]}. If alignment is positive, the text
is right-padding to fill the specified field length, if it's negative, it's
left-padded.

formatting strings

There's not much formatting that can be applied to a string. Only the padding /
alignment formatting options can be applied. These options are also available to
every argument, regardless of type.


example

output

String.Format("--{0,10}--", "test");

-- test--

String.Format("--{0,-10}--", "test");

--test --


formatting numbers

Number formatting is culture dependant. For
example, formatting a currency string on my laptop will return a result like
£9.99, formatting a currency on a machine set for the US region would return
$9.99.


specifier

type

format

output

(double 1.2345)

output

(int -12345)

c

currency

{0:c}

£1.23

-£12,345.00

d

decimal

(whole number)

{0:d}

System.FormatException

-12345

e

exponent / scientific

{0:e}

1.234500e+000

-1.234500e+004

f

fixed point

{0:f}

1.23

-12345.00

g

general

{0:g}

1.2345

-12345

n

number

{0:n}

1.23

-12,345.00

r

round trippable

{0:r}

1.23

System.FormatException

x

hexadecimal

{0:x4}

System.FormatException

ffffcfc7


custom number formatting


specifier

type

format

output

(double 1234.56)

0

zero placeholder

{0:00.000}

1234.560

#

digit placeholder

{0:#.##}

1234.56

.

decimal point placeholder

{0:0.0}

1234.6

,

thousand separator

{0:0,0}

1,235

%

percentage

{0:0%}

123456%


In addition there is the group separator; this is useful for varying the format,
depending on the value of the parameter passed. For example

String.Format("{0:£#,##0.00;(£#,##0.00);Nothing}", value);


This will output "£1,240.00" if passed 1243.56. It will output the same
format bracketed if the value is negative "(£1,240.00)", and will output the
string "Nothing" if the number is zero.


date formatting


Date formats are very dependant on the culture
information passed. The examples below are shown using the UK culture.


specifier

type

output

(June 8, 1970 12:30:59)

d

Short Date

08/06/1970

D

Long Date

08 June 1970

t

Short Time

12:30

T

Long Time

12:30:59

f

Full date and time

08 June 1970 12:30

F

Full date and time (long)

08 June 1970 12:30:59

g

Default date and time

08/06/1970 12:30

G

Default date and time (long)

08/06/1970 12:30:59

M

Day / Month

8 June

r

RFC1123 date string

Mon, 08 Jun 1970 12:30:59 GMT

s

Sortable date/time

1970-06-08T12:30:59

u

Universal time, local timezone

1970-06-08 12:30:59Z

Y

Month / Year

June 1970


custom date formatting


specifier

type

output

(June 8, 1970 12:30:59)

dd

Day

08

ddd

Short Day Name

Mon

dddd

Full Day Name

Monday

hh

2 digit hour

12

HH

2 digit hour (24 hour)

12

mm

2 digit minute

30

MM

Month

06

MMM

Short Month name

Jun

MMMM

Month name

June

ss

seconds

59

tt

AM/PM

PM

yy

2 digit year

70

yyyy

4 digit year

1970

:

seperator, e.g. {0:hh:mm:ss}

12:30:59

/

seperator, e.g. {0:dd/MM/yyyy}

08/06/1970


There are others, including time zone formatting and so on, but the ones above
are the most commonly used.


culture information


string.format also provides a method which accepts a

CultureInfo
argument, as an IFormatProvider. This is important when trying
to write portable and localisable code, as, for example, month names will change
according to the local culture of the machine you are running on. Rather than
simply call the standard String.Format you should consider always calling the
overloaded culture method. If you don't need to specify a culture you can use
the System.Globalization.CultureInfo.InvariantCulture. This will then default
your formatting to English, as opposed to the culture of the current thread.

17 May, 2010

Group and Count Records in SQL Server

Group and Count Records in SQL Server: From SQL Blog
I had recently written a query to Select the Latest Record based on a Condition in SQL Server. A SQLServerCurry.com reader Mazz wrote back asking how to use the same query to count how many times a student took an exam for each course. Here’s the modified query that works on SQL Server 2005/2008.
SAMPLE DATA:
DECLARE @TT TABLE (CandID int, CourseID smallint)

INSERT INTO @TT VALUES (1, 101)
INSERT INTO @TT VALUES (3, 102)
INSERT INTO @TT VALUES (3, 110)
INSERT INTO @TT VALUES (3, 102)
INSERT INTO @TT VALUES (1, 101)
INSERT INTO @TT VALUES (2, 101)
INSERT INTO @TT VALUES (1, 110)
INSERT INTO @TT VALUES (1, 109)
INSERT INTO @TT VALUES (2, 102)
INSERT INTO @TT VALUES (1, 110)
INSERT INTO @TT VALUES (1, 101)
INSERT INTO @TT VALUES (3, 110)
INSERT INTO @TT VALUES (2, 102)
QUERY
;WITH CTE
AS
(
SELECT
ROW_NUMBER() OVER (PARTITION BY CANDID, CourseID ORDER BY CandID) as ord,
CandID, CourseID
FROM @TT
)
SELECT CandID, CourseID, Count(CourseID) as TotalAttempts
FROM CTE
GROUP BY CandID, CourseID
ORDER BY CandID
OUTPUT

Count Records SQL Server

Automated Pagination For List Items: Pajinate

Automated Pagination For List Items: Pajinate: from Webresource Depot
Pajinate is a jQuery plugin that can auto-generate a paginated navigation for list items or any other areas of content.

The plugin is specially handy when working with long lists in a limited space (but still require a quick navigation).

The pagination menu generated has the first-last, prev-next and the page numbers and the text for them can be customized.

jQuery Pajinate

It is also possible to set the:


  • items per page
  • number of page links to be displayed
  • start page on load

To mention, using a browser-side paging is, almost always, quicker compared to the server-side one unless there is a reasonable number of items to be displayed. Else, implementing a server-side pagination will save you both the performance and bandwidth.

Special Downloads:

Ajaxed Add-To-Basket Scenarios With jQuery And PHP

Free Admin Template For Web Applications

jQuery Dynamic Drag’n Drop

ScheduledTweets

14 May, 2010

Access Denied

Access Denied: By Slmple-Talk
When Microsoft executives wake up in the night screaming, I suspect they are having a nightmare about their own version of Frankenstein's monster. Created with the best of intentions, without thinking too hard of the long-term strategy, and having long outlived its usefulness, the monster still lives on, occasionally wreaking vengeance on the innocent. Its name is Access; a living synthesis of disparate body parts that is resistant to all attempts at a mercy-killing.
In 1986, Microsoft had no database products, and needed one for their new OS/2 operating system, the successor to MSDOS. In 1986, they bought exclusive rights to Sybase DataServer, and were also intent on developing a desktop database to capture Ashton-Tate's dominance of that market, with dbase. This project, first called 'Omega' and later 'Cirrus', eventually spawned two products: Visual Basic in 1991 and Access in late 1992. Whereas Visual Basic battled with PowerBuilder for dominance in the client-server market, Access easily won the desktop database battle, with Dbase III and DataEase falling away. Access did an excellent job of abstracting and simplifying the task of building small database applications in a short amount of time, for a small number of departmental users, and often for a transient requirement.
There is an excellent front end and forms generator. We not only see it in Access but parts of it also reappear in SSMS. It's good. A business user can pull together useful reports, without relying on extensive technical support. A skilled Access programmer can deliver a fairly sophisticated application, whilst the traditional client-server programmer is still sharpening his pencil. Even for the SQL Server programmer, the forms generator of Access is useful for sketching out application designs.
So far, so good, but here's where the problems start; Access ties together two different products and the backend of Access is the bugbear. The limitations of Jet/ACE are well-known and documented. They range from MDB files that are prone to corruption, especially as they grow in size, pathetic security, and "copy and paste" Backups. The biggest problem though, was an infamous lack of scalability. Because Microsoft never realized how long the product would last, they put little energy into improving the beast.
Microsoft 'ate their own dog food' by using Access for Microsoft Exchange and Outlook. They choked on it. For years, scalability and performance problems with Exchange Server have been laid at the door of the Jet Blue engine on which it relies. Substantial development work in Exchange 2010 was required, just in order to improve the engine and storage schema so that it more efficiently handled the reading and writing of mails. The alternative of using SQL Server just never panned out.
The Jet engine was designed to limit concurrent users to a small number (10-20). When Access applications outgrew this, bitter experience proved that there really is no easy upgrade path from Access to SQL Server, beyond rewriting the whole lot from scratch. The various initiatives to do this never quite bridged the cultural gulf between Access and a true relational database
So, what are the obvious alternatives for small, strategic database applications? I know many users who, for simple 'list maintenance' requirements are very happy using Excel databases. Surely, now that PowerPivot has led the way, it is time for Microsoft to offer a new RAD package for database application development; namely an Excel-based front end for SQL Server Express. In that way, we'll have a powerful and familiar front end, to a scalable database, and a clear upgrade path when an app takes off and needs to go enterprise.

12 May, 2010

How To: Creating Thumbnail Images

Introduction
Web site image galleries can be an effective method of communicating with visitors.  Although images may enhance a site, you must still be aware of the penalties associated with slow download times.  A nice compromise to this situation is to present images as thumbnails.  This way, a visitor will be able to browse your thumbnail gallery, selecting only those images they find interesting.  This article shows how to create thumbnail images, which speed things up and make the visit more enjoyable.
The ASP.NETPage
Normal code for displaying images in ASP.NETincludes an Image control on the page, decorated with an ImageUrl attribute with the URL of the picture file you want to display.  The tricky part is translating that picture from full size to thumbnail.  The method we use is by specifying a web page URL for the ImageUrl attribute, which is not immediately intuitive (Listing 1).
Listing 1: ASP.NETPage to Display Thumbnail Image: Thumbnail.aspx
<asp:Imagerunat="server" ImageUrl="MakeThumbnail.aspx?file=fall800.jpg"/>
Think of the MakeThumbnail.aspx web page as a program, rather than the visible representation of an ASP.NETpage you're accustomed to.  In that context, we're simply sending it a parameter named file, which contains fall800.jpg as it's value.  The MakeThumbnail.aspx page will return the thumbnail representation of the full size picture from the file name submitted.  Since the MakeThumbnail.aspx page will not appear on any screen, it only needs a Page directive (Listing 2) with a reference to it's Codebehind file.
Listing 2: ASP.NETPage to Create a Thumbnail Image: MakeThumbnail.aspx
    <%@ Page language="c#" Codebehind="MakeThumbnail.aspx.cs" Inherits="Thumbnail.MakeThumbnail" %>
The Codebehind page
The MakeThumbnail.aspx page is as simple as can be, specifying the Codebehind page and class it Inherits from.  There's no need for anything more since there's no reason for it to display.  The real work of creating the thumbnail image is in the Page_Load event of the Codebehind page MakeThumbnail.aspx.cs (Listing 3).
Listing 3: Code  to Create a Thumbnail Image: MakeThumbnail.aspx.cs

   1:  ///<summary>
   2:  ///Creates a thumbnail image from a file spec in the calling URL.
   3:  ///</summary>
   4:  publicclass MakeThumbnail : System.Web.UI.Page
   5:  {
   6:      private void Page_Load(object sender, System.EventArgs e)
   7:      {
   8:          // get the file name -- fall800.jpg
   9:          string file = Request.QueryString["file"];
  10:   
  11:          // create an image object, using the filename we just retrieved
  12:          System.Drawing.Image image = System.Drawing.Image.FromFile(Server.MapPath(file));
  13:   
  14:          // create the actual thumbnail image
  15:          System.Drawing.Image thumbnailImage = image.GetThumbnailImage(64, 64, new 
                                System.Drawing.Image.GetThumbnailImageAbort(ThumbnailCallback), IntPtr.Zero);
  16:   
  17:          // make a memory stream to work with the image bytes
  18:          MemoryStream imageStream = new MemoryStream();
  19:   
  20:          // put the image into the memory stream
  21:          thumbnailImage.Save(imageStream, System.Drawing.Imaging.Imageformat.Jpeg);
  22:   
  23:          // make byte array the same size as the image
  24:          byte[] imageContent = new Byte[imageStream.Length];
  25:   
  26:          // rewind the memory stream
  27:          imageStream.Position = 0;
  28:   
  29:          // load the byte array with the image
  30:          imageStream.Read(imageContent, 0, (int)imageStream.Length);
  31:   
  32:          // return byte array to caller with image type
  33:          Response.ContentType = "image/jpeg";
  34:          Response.BinaryWrite(imageContent);
  35:      }
  36:   
  37:      ///<summary>
  38:      ///Required, but not used
  39:      ///</summary>
  40:      ///<returns>true</returns>
  41:      public bool ThumbnailCallback()
  42:      {
  43:          return true;
  44:      }
  45:   
  46:      // ... non-applicable infrastructure code removed for clarity ...
  47:   
  48:  }
  49:   
After getting the file name and creating an Image from this file, Listing 3 performs the call to the GetThumbnailImage() method of the Image object, as shown below:
        System.Drawing.Image thumbnailImage = image.GetThumbnailImage(64, 64, new System.Drawing.Image.GetThumbnailImageAbort(ThumbnailCallback), IntPtr.Zero);
Given an Image object, you can call the GetThumbnailImage() method to render a new Image object of the size you want.  The first two parameters are the width and height, respectively.  The next two parameters are not used and have no purpose.  However, they must be included because the GetThumbnailImage() method signature requires their presence.
A byte[] with the image data is required for returning to the caller.  Since the Image object doesn't directly support this, we have to perform a couple translations to get the image data into the proper format.  Here's the sequence:

  1. Create a MemoryStream object.

  2. Save the Image object into the MemoryStream.

  3. Write the MemoryStream into a byte array.
The code (Listing 3) after the GetThumbnailImage() method call is commented to reflect these steps.
Remember to set the ContentType property of the Response object before sending the byte[] back to the caller.  In Listing 3, I hard coded this.  If an application works with multiple image types, you can handle this by (1) parsing the extension from the file name or (2) checking the Rawformat property of the Image object, which returns an Imageformat object.
Source Code
Thumbnails.zip - Visual Studio .NETSolution with full source code for this article.
Summary
presenting thumbnail images is an effective way to reduce bandwidth to speed up image browsing for visitors.  This article covered how to obtain a thumbnail image by specifying an Image control on a web page that referenced another web page.  The other web page produced the thumbnail image and returned it in the Response object for the calling web page to display.

10 May, 2010

Creating an ASP.NET report using Visual Studio 2010 - Part 3

Creating an ASP.NET report using Visual Studio 2010 - Part 3: We continue
building our report in this three part series.
Creating an ASP.NET report using Visual Studio 2010 - Part 1

Creating an ASP.NET report using Visual Studio 2010 - Part 2
Adding the
ReportViewer control and filter drop downs.
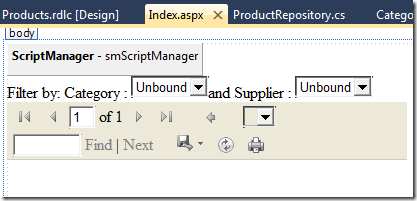
Open the source
code for index.aspx and add a ScriptManager control. This control is required for
the ReportViewer control. Add a DropDownList for the categories and suppliers. Add
the ReportViewer control. The markup after these steps is shown below.
<div>
<asp:ScriptManager ID="smScriptManager" runat="server">
</asp:ScriptManager>
<div id="searchFilter">
Filter by: Category :
<asp:DropDownList ID="ddlCategories" runat="server" />
and Supplier :
<asp:DropDownList ID="ddlSuppliers" runat="server" />
</div>
<rsweb:ReportViewer ID="rvProducts" runat="server">
</rsweb:ReportViewer>
</div>
The design view for index.aspx is shown below. The dropdowns will display the categories
and suppliers in the database. Changing the selection in the drop downs will cause
the report to be filtered by the selections in the dropdowns. You will see how to
do this in the next steps.
image

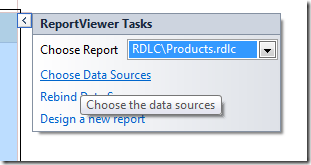
Attaching the RDLC to the ReportViewer control by clicking on the top right of the
control, going to Report Viewer tasks and selecting Products.rdlc.
image

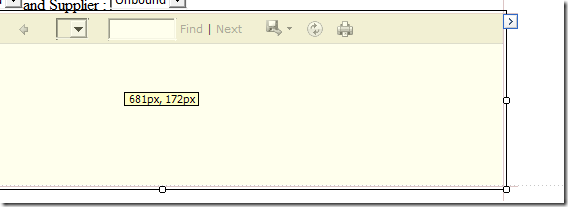
Resize the ReportViewer control by dragging at the bottom right corner. I set mine
to 800px x 500px. You can also set this value in source view.
image
Defining the data sources. We will now define the Data Source used
to populate the report. Go back to the “ReportViewer Tasks” and select “Choose Data
Sources”
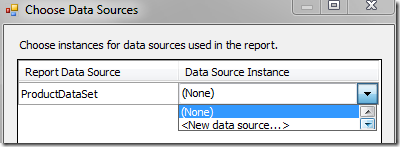
image
Select a “New data source..”
image
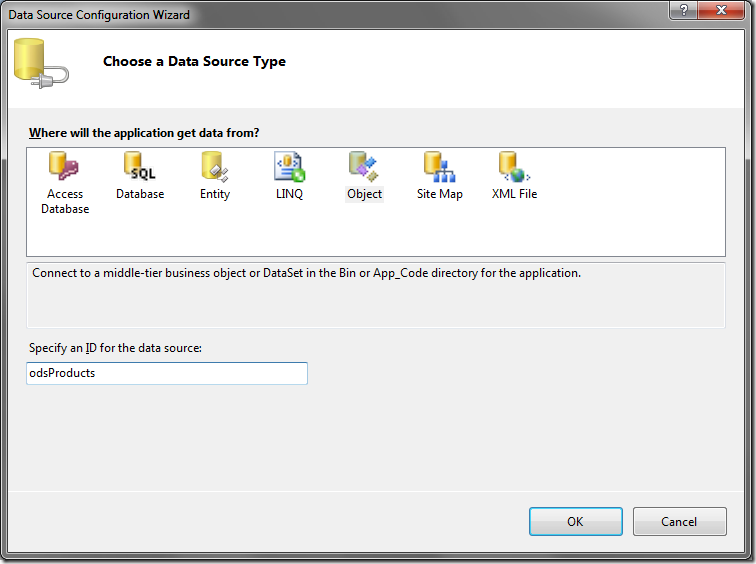
Select “Object” and name your Data Source ID “odsProducts”
image
In the next screen, choose “ProductRepository” as your business object.
image
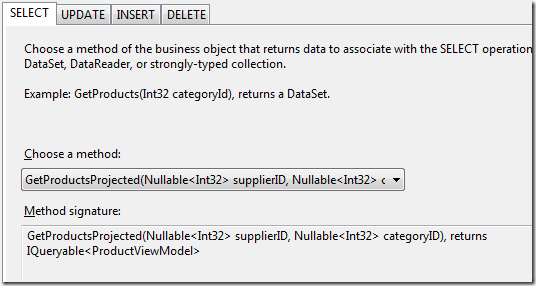
Choose “GetProductsProjected” in the next screen.
image
The method requires a SupplierID and CategoryID. We will set these so that our data
source gets the values from the drop down lists we defined earlier. Set the parameter
source to be of type “Control” and set the ControlIDs to be ddlSuppliers and ddlCategories
respectively. Your screen will look like this:
image
We are now going to define the data source for our drop downs. Select the ddlCategory
drop down and pick “Choose Data Source”.
image
Pick “Object” and give it an id “odsCategories”
image
In the next screen, choose “ProductRepository”
image
Select the GetCategories() method in the next screen.
image

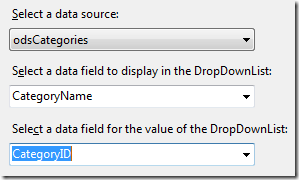
Select “CategoryName” and “CategoryID” in the next screen. We are done defining
the data source for the Category drop down.
image
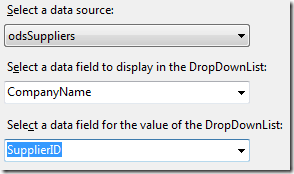
Perform the same steps for the Suppliers drop down.
image
image
image
Select eachdropdown and set the AppendDataBoundItems to true and AutoPostback
to true.
image
The AppendDataBoundItems is needed because we are going to insert an “All“ list
item with a value of empty. Go to each drop down and add this list item markup
as shown below>
image

Finally, double click on each drop down in the designer and add the following code
in the code behind. This along with the “Autopostback= true” attribute refreshes
the report anytime a drop down is changed.

protected void ddlCategories_SelectedIndexChanged(object sender, EventArgs e)
{
rvProducts.LocalReport.Refresh();
}

protected void ddlSuppliers_SelectedIndexChanged(object sender, EventArgs e)
{
rvProducts.LocalReport.Refresh();
}
Compile your report and run the page. You should see the report rendered. Note that
the tool bar in the ReportViewer control gives you a couple of options including
the ability to export the data to Excel, PDF or word.
image
Conclusion Through this three part series, we did the following:
  • Created a data layer for use by our RDLC.
  • Created an RDLC using the report wizard and define a dataset for the report.
  • Used the report design surface to design our report including adding a chart.
  • Used the ReportViewer control to attach the RDLC.
  • Connected our ReportWiewer to a data source and take parameter values from the drop
    downlists.
  • Used AutoPostBack to refresh the reports when the dropdown selection was changed.
RDLCs allow you to create interactive reports including drill downs and grouping.
For even more advanced reports you can use
Microsoft® SQL Server™ Reporting Services
with RDLs. With RDLs, the report
is rendered on the report server instead of the web server. Another nice thing about
RDLs is that you can define a parameter list for the report and it gets rendered
automatically for you. RDLCs and RDLs both have their advantages and its best to
compare them and choose the right one for your requirements. Download VS2010
RTM Sample project

Alfred Borden: Are you watching closely?

Creating an ASP.NET report using Visual Studio 2010 - Part 2

Creating an ASP.NET report using Visual Studio 2010 - Part 2: "
Creating the Client Report Definition file (RDLC) Add a folder
called “RDLC”. This will hold our RDLC report.
image

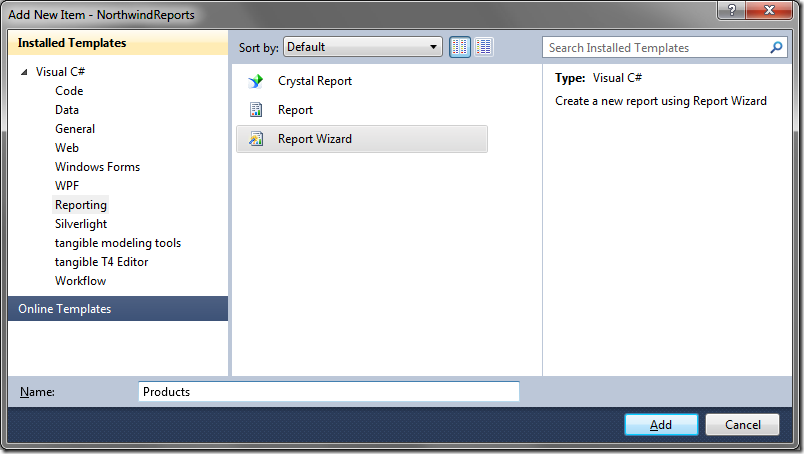
Right click on the RDLC folder, select “Add new item..” and add an “RDLC” name of
“Products”. We will use the “Report Wizard” to walk us through the steps of creating
the RDLC.
image

In the next dialog, give the dataset a name called “ProductDataSet”. Change the
data source to “NorthwindReports.DAL” and select “ProductRepository(GetProductsProjected)”.
The fields that are returned from the method are shown on the right. Click next.

image

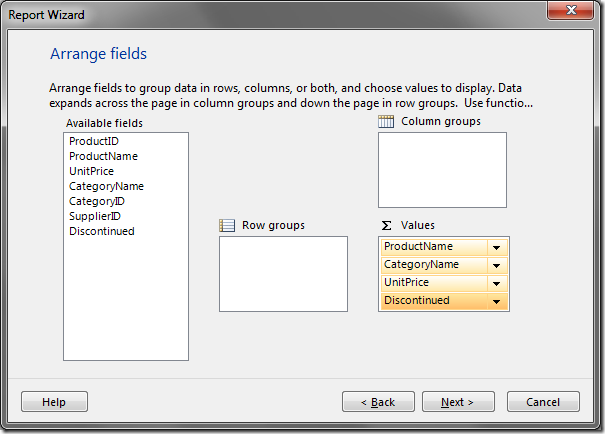
Drag and drop the ProductName, CategoryName, UnitPrice and Discontinued into the
Values container. Note that you can create much more complex grouping using this
UI. Click Next.
image
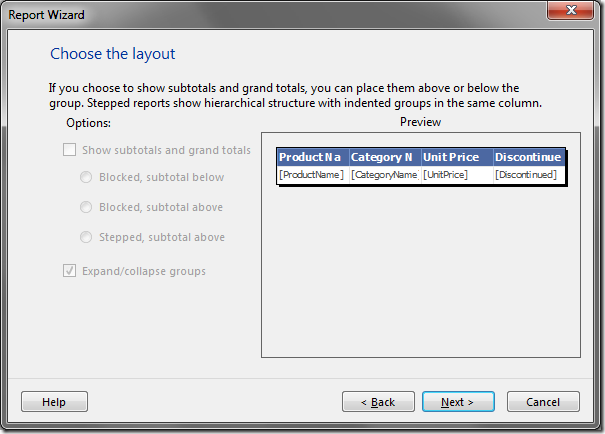
Most of the selections on this screen are grayed out because we did not choose a
grouping in the previous screen. Click next.
image
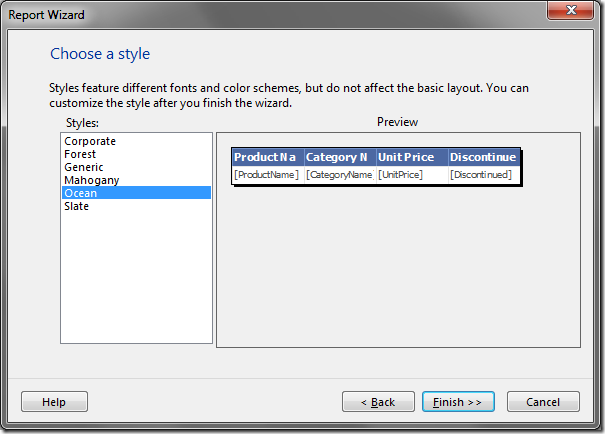
Choose a style for your report. Click next.
image
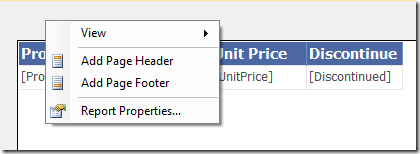
The report graphic design surface is now visible. Right click on the report and
add a page header and page footer.
image
With the report design surface active, drag and drop a TextBox from the tool box
to the page header. Drag one more textbox to the page header. We will use the text
boxes to add some header text as shown in the next figure.
image
You can change the font size and other properties of the textboxes using the formatting
tool bar (marked in red). You can also resize the columns by moving your cursor
in between columns and dragging.
image
Adding Expressions Add two more text boxes to the page footer.
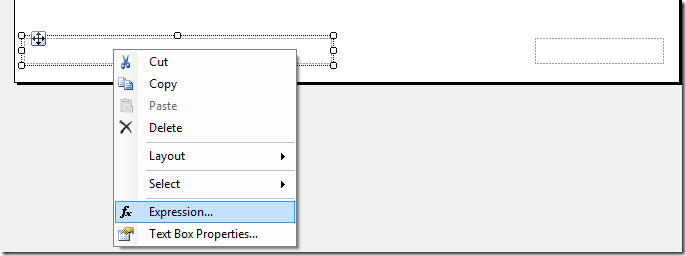
We will use these to add the time the report was generated and page numbers. Right
click on the first textbox in the page footer and select “Expression”.
image
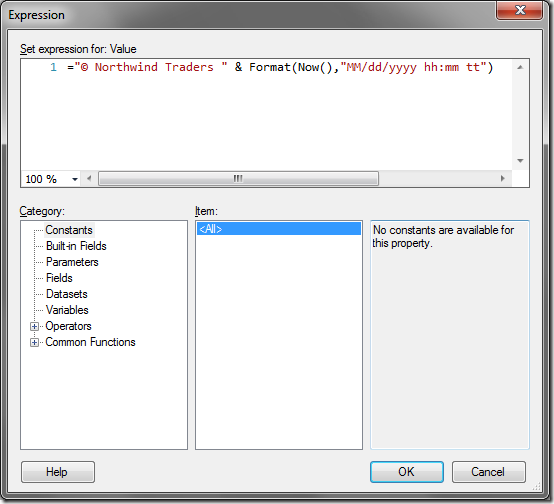
Add the following expression for the print date (note the = sign at the left of
the expression in the dialog below)
image
"© Northwind Traders " & Format(Now(),"MM/dd/yyyy hh:mm tt")
Right click on the second text box and add the following for the page count.
Globals.PageNumber & 
                    " of " & Globals.TotalPages
Formatting the page footer is complete.
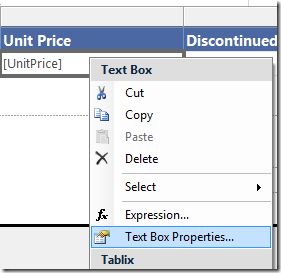
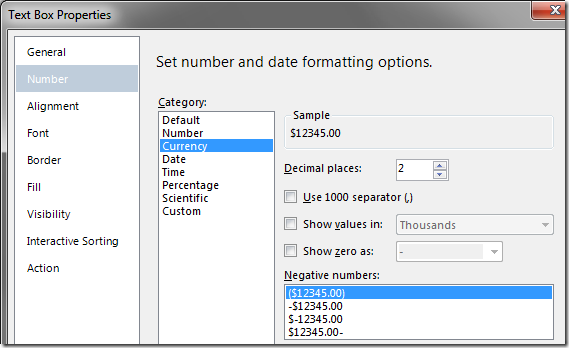
We are now going to format the “Unit Price” column so it displays the number in
currency format. Right click on the [UnitPrice] column (not header) and select
“Text Box Properties..”
image
Under “Number”, select “Currency”. Hit OK.
image
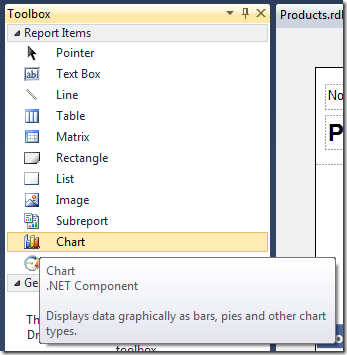
Adding a chart With the design surface active, go to the toolbox
and drag and drop a chart control. You will need to move the product list table
down first to make space for the chart contorl. The document can also be resized
by dragging on the corner or at the page header/footer separator.
image
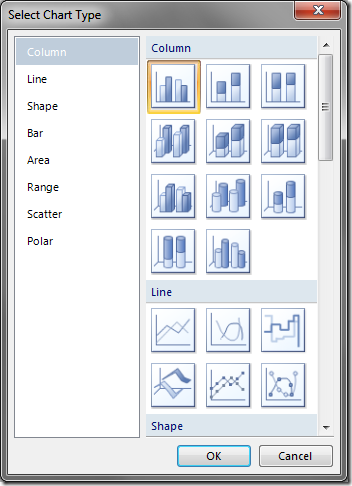
In the next dialog, pick the first chart type. This can be changed later if needed.
Click OK. The chart gets added to the design surface.
image
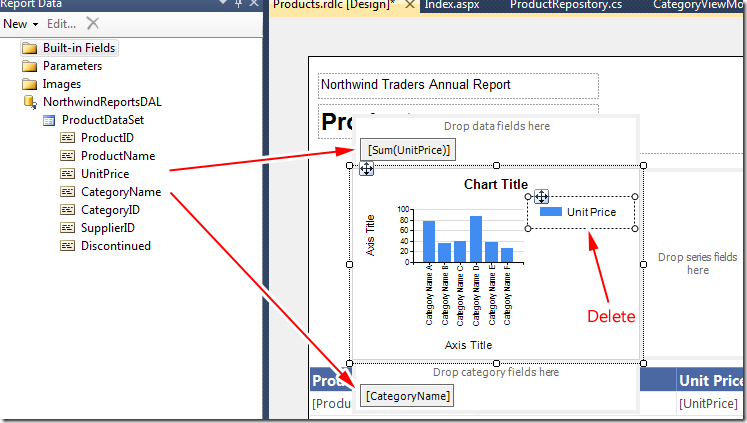
Click on the blue bars in the chart (not legend). This will bring up drop locations
for dropping the fields. Drag and drop the UnitPrice and CategoryName into the top
(y axis) and bottom (x axis) as shown below. This will give us the total unit prices
for a given category. That is the best I could come up with as far as what report
to render, sorry :-) Delete the legend area to get more screen estate.
image
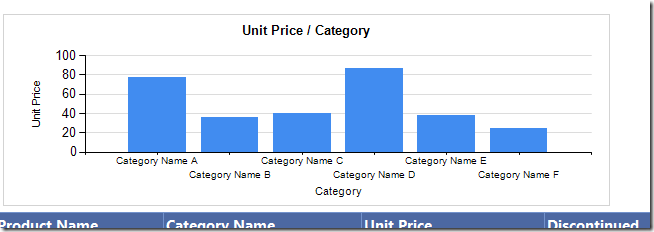
Resize the chart to your liking. Change the header, x axis and y axis text by double
clicking on those areas.
image
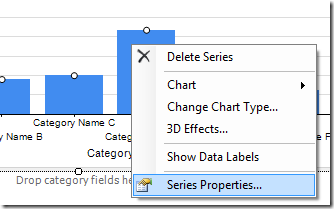
We made it this far. Let’s impress the client by adding a gradient to the bar graph
:-) Right click on the blue bar and select “Series properties”.
image
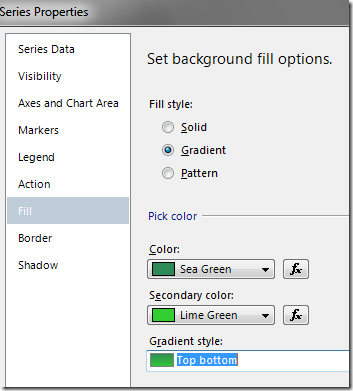
Under “Fill”, add a color and secondary color and select the Gradient style.
image

We are done designing our report. In the next section you will see how to add the
report to the report viewer control, bind to the data and make it refresh when the
filter criteria are changed. Creating an ASP.NET report using Visual Studio 2010 - Part 3

Creating an ASP.NET report using Visual Studio 2010 - Part 1

Creating an ASP.NET report using Visual Studio 2010 - Part 1
This tutorial walks you through creating an report based on the Northwind sample database. You
will add a client report definition file (RDLC), create a dataset for the RDLC,
define queries using LINQ to Entities, design the report and add a ReportViewer
web control to render the report in a ASP.NET web page. The report will have a chart
control. Different results will be generated by changing filter criteria. At the
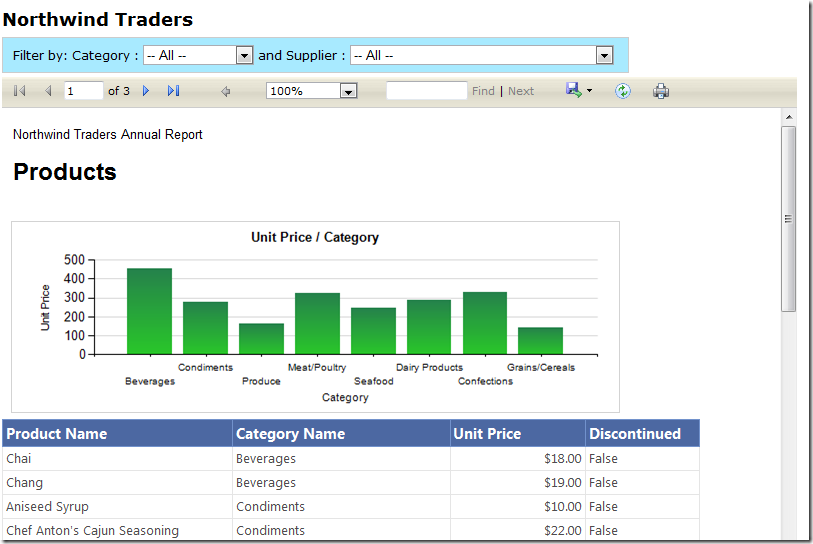
end of the walkthrough, you should have a UI like the following. From the UI below,
a user is able to view the product list and can see a chart with the sum of Unit
price for a given category. They can filter by Category and Supplier. The drop downs
will auto post back when the selection is changed. This demo uses Visual Studio
2010 RTM.
This post is split into three parts. The last part has the
sample code attached. Creating an ASP.NET report using Visual Studio 2010 - Part 2 Creating an ASP.NET report using Visual Studio 2010 - Part 3
image


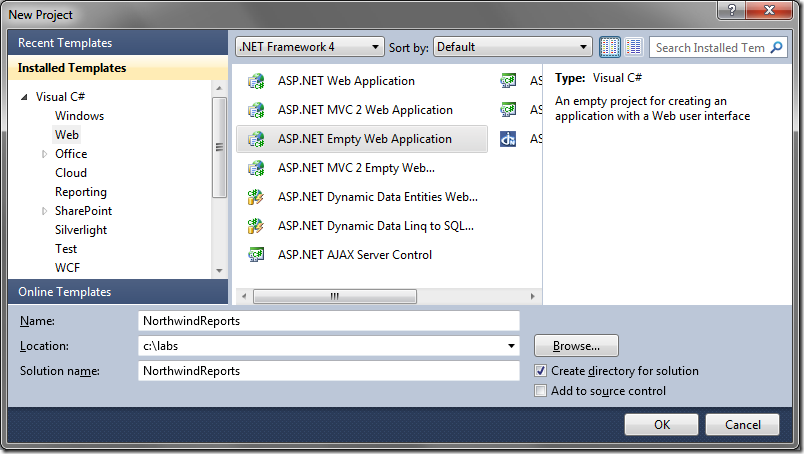
Lets start by creating a new ASP.NET empty web application called “NorthwindReports”
image


Creating the Data Access Layer (DAL) Add a web form called index.aspx
to the root directory. You do this by right clicking on the NorthwindReports web
project and selecting “Add item..” . Create a folder called “DAL”. We will store
all our data access methods and any data transfer objects in here.
image


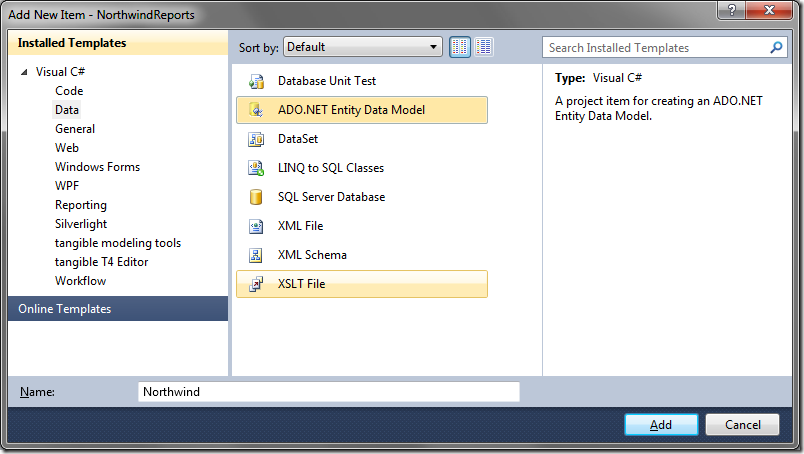
Right click on the DAL folder and add a ADO.NET Entity data model called Northwind.
image


Select “Generate from database” and click Next.

image


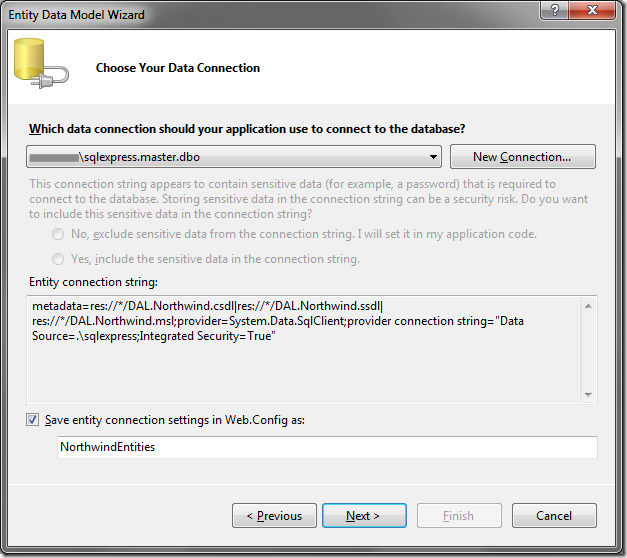
Create a connection to your database containing the Northwind sample database and
click Next.
image


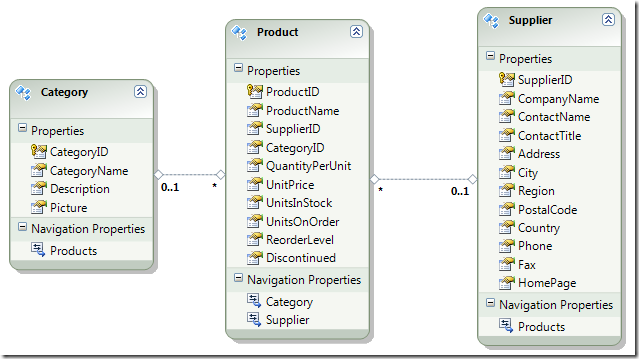
From the table list, select Categories, Products and Suppliers and click next.
image


Our Entity data model gets created and looks like this:
image


Adding data transfer objects Right click on the DAL folder and
add a ProductViewModel. Add the following code. This class contains properties we
need to render our report.

public class ProductViewModel
{

    public int? ProductID { get; set; }

    public string ProductName { get; set; }

    public System.Nullable<decimal> UnitPrice { get; set; }

    public string CategoryName { get; set; }

    public int? CategoryID { get; set; }

    public int? SupplierID { get; set; }

    public bool Discontinued { get; set; }
}
Add a SupplierViewModel class. This will be used to render the supplier DropDownlist.

public class SupplierViewModel
{

    public string CompanyName { get; set; }

    public int SupplierID { get; set; }
}
Add a CategoryViewModel class.

public class CategoryViewModel
{

    public string CategoryName { get; set; }

    public int CategoryID { get; set; }
}
Create an IProductRepository interface. This will contain the signatures of all
the methods we need when accessing the entity model. This step is not needed but
follows the repository
pattern
.

interface IProductRepository
{
IQueryable<Product> GetProducts();
IQueryable<ProductViewModel> GetProductsProjected(int? supplierID, int? categoryID);
IQueryable<SupplierViewModel> GetSuppliers();
IQueryable<CategoryViewModel> GetCategories();
}
Create a ProductRepository class that implements the IProductReposity above. The
methods available in this class are as follows:
  • GetProducts – returns an IQueryable of all products.
  • GetProductsProjected – returns an IQueryable of ProductViewModel. The method filters
    all the products based on SupplierId and CategoryId if any. It then projects the
    result into the ProductViewModel.
  • GetSuppliers() – returns an IQueryable of all suppliers projected into a SupplierViewModel
  • GetCategories() – returns an IQueryable of all categories projected into a CategoryViewModel

public class ProductRepository : IProductRepository
{
/// <summary>
/// IQueryable of all Products
/// </summary>
/// <returns></returns>
public IQueryable<Product> GetProducts()
{
var dataContext = new NorthwindEntities();
var products = from p in dataContext.Products
select p;
return products;
}
/// <summary>
/// IQueryable of Projects projected 
/// into the ProductViewModel class
/// </summary>
/// <returns></returns>
public IQueryable<ProductViewModel> GetProductsProjected(int? supplierID, int? categoryID)
{
var projectedProducts = from p in GetProducts()
select new ProductViewModel
{
ProductID = p.ProductID,
ProductName = p.ProductName,
UnitPrice = p.UnitPrice,
CategoryName = p.Category.CategoryName,
CategoryID = p.CategoryID,
SupplierID = p.SupplierID,
Discontinued = p.Discontinued
};
// Filter on SupplierID 

if (supplierID.HasValue)
{
projectedProducts = projectedProducts.Where(a => a.SupplierID == supplierID);
}
// Filter on CategoryID 

if (categoryID.HasValue)
{
projectedProducts = projectedProducts.Where(a => a.CategoryID == categoryID);
}

return projectedProducts;
}

public IQueryable<SupplierViewModel> GetSuppliers()
{
var dataContext = new NorthwindEntities();
var suppliers = from s in dataContext.Suppliers
select new SupplierViewModel
{
SupplierID = s.SupplierID,
CompanyName = s.CompanyName
};

return suppliers;
}

public IQueryable<CategoryViewModel> GetCategories()
{
var dataContext = new NorthwindEntities();
var categories = from c in dataContext.Categories
select new CategoryViewModel
{
CategoryID = c.CategoryID,
CategoryName = c.CategoryName
};

return categories;
}
}
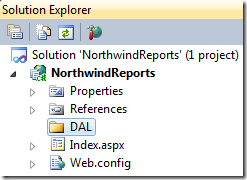
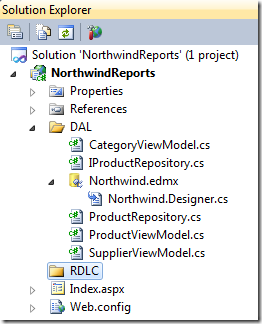
Your solution explorer should look like the following.
image
Build your project and make sure you don’t get any errors. In the
next part, we will see how to create the client report definition file using the
Report Wizard. Creating an ASP.NET report using Visual Studio 2010 - Part 2